I've started several times by now to work on the Spring project from scratch, where I had to combine several different tools so that I can begin to program something concrete. That procedure eats time, and every time I forget something how I done it previously. Since I started writing this blog, it would be probably smart to write down the whole procedure if I forget anything next time, and perhaps also help someone to start a project and not spend hours banging their heads on how to combine a couple of tools in one whole project.
Prerequisite
This won't be literally step-by-step tutorial, I expect that everybody can download the latest versions of these tools that I will use. You will need Eclipse, Maven, Tomcat, MySql and you should download and install the latest versions. You don't need to download Spring and Hibernate since we will tell Maven to download it for us (we will configure XML file). And finally you should download Twitter Bootstrap because I will use it for front-end part in our JSP. If you haven't heard for this tool, it is basically a set of CSS and JavaScript files developed by Twitter so programmers can easily and fast create some fancy pages and features on these pages. You will also need jQuery because Twitter Bootstrap uses it.
Eclipse + Maven + project structure
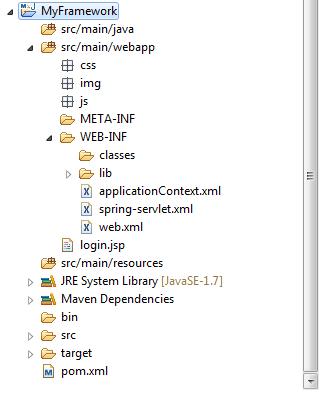
Let's roll! When you open Eclipse you should create Maven project, BUT I suggest that you create simple Java project. After that you should convert it into Maven project. I like to do this way because when you create maven project the wizard will ask you to enter many confusing things about the project, and you could be puzzled with it if you didn't work with Maven before. When you create Java project, you only need to enter project name, the wizard for converting this project to Maven will do the rest. For this converting you should select your project and under configure submenu you should find 'Convert to Maven project'. Now you have your Maven project. Next thing you should do is to set your project structure, that is to create all the folders in the proper places of your project that you will be needed to launch the site in the browser. I suggest that you first delete the source folder 'src' and create your own source folders: 'src/main/java', 'src/main/webapp' and 'src/main/resources'. After that you should create the other folders (css, img, js) under 'src/main/webapp', you can see the structure on next picture:
In this step you should also create landing-page.jsp and that will be the first page that is displayed in the browser when you start your project. For now, you can insert in this file any text you want, you just want to test if that text is displayed in the browser when you start your project. Later we will modify this file.
The next thing you need to add here is three files: applicationContext.xml, spring-servlet.xml and web.xml. Now, you should edit these files if you want to run the project. I am not going to post the code that you need to add in these files, but you can download my project from: https://github.com/nikolatodorovic/spring_hibernate_mysql_maven_tomcat and you can see the content of these files. There are plenty of explanations about these files on the Internet and it would be probably good to read them.
The last thing, but maybe the most important is to configure pom.xml file. It is the main file for Maven and it contains information about the project and configuration details that Maven uses to build the project. In this file, you are telling Maven to use Spring and other tools. Therefore you don't need to download anything about Spring or Hibernate, only you need to do is to configure this file and Maven will do it for you. Again, I won't post code here, you should download it and copy/past from my project. Every other explanation about this you can find across the Internet.
Maven build + Tomcat
So, we now want to start this project and we need Tomcat for that. But first we need to build it. You can easily do this by using Maven commands. I recommend that you create run configuration with defined goals and after that you can build your project within Eclipse, you don't need to use command line. When you create new run configuration you should select your project (base directory) and enter 'clean install war:inplace' in goals field. That command will create WAR file from your files.
Now we have WAR file and we need to start Tomcat instance so that we can deploy this WAR file to that instance. You can copy and past this WAR file in the folder: 'tomcat_home\webapps' but don't do that. Every time you make some change on any file inside your project, you need to stop Tomcat instance, do another Maven build, copy/past new WAR file in this location and start Tomcat instance again. This is really pain in the ass... Instead of that, you should configure your Tomcat so it can read your files from your workspace. And if you do that, when you modify something in your JSP while your Tomcat instance is running you even don't need to stop that instance, do another Maven build and start Tomcat again. You just need to refresh your browser to see those changes. This procedure saves time incredibly! And it is very easy to accomplish this, you need to create one XML file with the name of your project, put it in: 'tomcat_home\conf\Catalina\localhost' and insert this code in the file:
<Context docBase="D:\Workspace\Eclipse\MyFramework\src\main\webapp"></Context>
Of course, you need to set your own path. By doing this, you are telling Tomcat where is located your source folder with JSP files, CSS files, JS files... When you do that you only need to restart Tomcat if you make some changes on the back-end, not on the front-end.
Now this is the time to test if this is working. If you did everything correct, when you enter your project name in the browser, your login page should be displayed. You can change some text in that file so you can test if refreshing of the browser displays changes on that page.
Spring
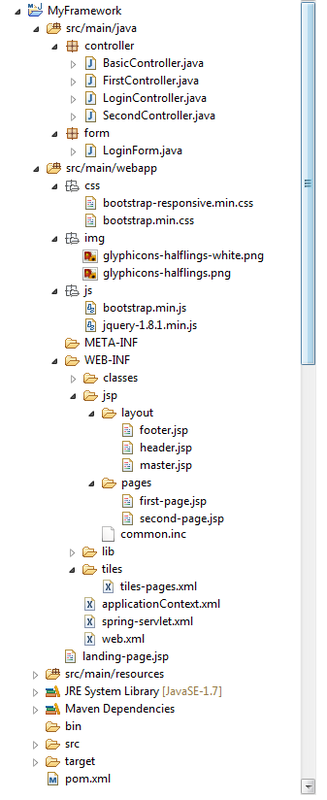
Next thing we'll do is to create a few basic pages, create layout for our project and use a little of Twitter Bootstrap for front-end. You should have a project structure as it is shown on the next picture:
From this picture and downloaded files, you can see what you should do with Twitter Bootstrap's files. You should also create controller files where is all the logic located. These are very simple files so I don't need to explain how it works, I hope you can manage it yourself. Be sure to set up your pom.xml file correctly to use Spring.
Hibernate + mySql
Now let's go to another step - adding some database in the project. If you downloaded this project from gitHub you can find a file in it called database.sql. You should run that file on your own database so you can configure this project correctly. When you install mySql, you should choose what client you will use for managing you databases. I am using Heidi (www.heidisql.com), but you can use whatever you want... After creating this database, you should open file jdbc.properties located in WEB-INF folder and edit it according to your database connection parameters.
After you created database, you need to configure pom.xml file so you can use Hibernate in your project. If you copied my pom file, you should be fine. At the end you have to create hibernate.cfg.xml file under 'src/main/resources' and copy/past content from my project. Now it is all set up for using Hibernate and you can create model classes, DAO classes and service classes. This is a very good procedure how you can organize your code, but you can organize it anyway you like.
After you created database, you need to configure pom.xml file so you can use Hibernate in your project. If you copied my pom file, you should be fine. At the end you have to create hibernate.cfg.xml file under 'src/main/resources' and copy/past content from my project. Now it is all set up for using Hibernate and you can create model classes, DAO classes and service classes. This is a very good procedure how you can organize your code, but you can organize it anyway you like.
The End
And that's basically it. I won't go into details on how to use Spring, Hibernate, you can find all the necessary infos on the Web. Also, study my project and you can learn how to set up your configuration files, how to add pages, entity classes and so on... Since you read this this far, I hope it was useful :) Please leave a comment if you have any suggestion.


 RSS Feed
