It's good to be awesome
Nikola Todorovic
  • Home
  • Hire Me
  • Nikola's Blog
  • Professional Career
  • Biography
  • Photo Gallery
  • Contact

RUBY METAPROGRAMMING

8/12/2015

1 Comment

 
(Note: this post I originally published at the TopTal Blog)
You often hear that metaprogramming is something that only Ruby ninjas use, and that it simply isn't for common mortals. But the truth is that metaprogramming isn't something scary at all. This blog post will serve to challenge this type of thinking and to get metaprogramming closer to the average Ruby developer so that they can also reap its benefits.
Picture
It should be noted that metaprogramming could mean a lot and it can often be very misused and go to the extreme when it comes to usage so I will try to throw in some real world examples that everyone could use in everyday programming.

METAPROGRAMMING

Metaprogramming is a technique by which you can write code that writes code by itself dynamically at runtime. This means you can define methods and classes during runtime. Crazy, right? In a nutshell, using metaprogramming you can reopen and modify classes, catch methods that don’t exist and create them on the fly, create code that is DRY by avoiding repetitions, and more.

THE BASICS

Before we dive into serious metaprogramming we must explore the basics. And the best way to do that is by example. Let’s start with one and understand Ruby metaprogramming step-by-step. You can probably guess what this code is doing:
class Developer

  def self.backend
    "I am backend developer"
  end
  
  def frontend
    "I am frontend developer"
  end

end
We have defined a class with two methods. The first method in this class is a class method and the second one is an instance method. This is basic stuff in Ruby, but there is much more happening behind this code which we need to understand before we proceed further. It is worth pointing out that the class Developer itself is actually an object. In Ruby everything is an object, including classes. Since Developer is an instance, it is an instance of class Class. Here is how the Ruby object model looks like:
Picture
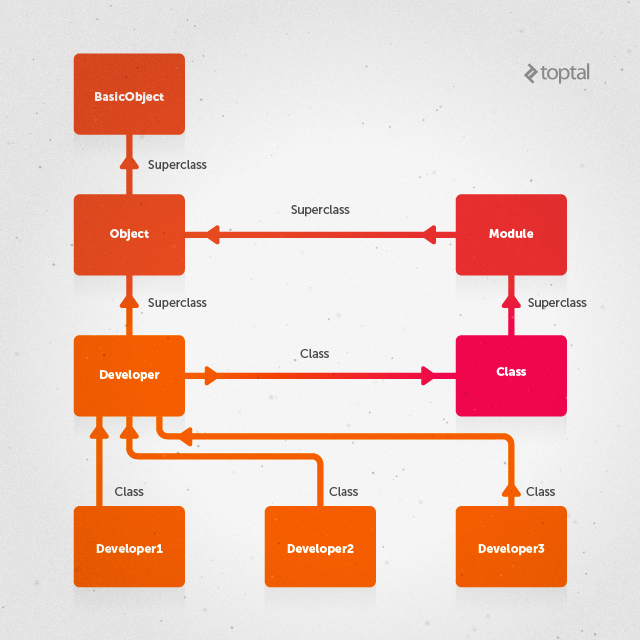
p Developer.class # Class
p Class.superclass # Module
p Module.superclass # Object
p Object.superclass # BasicObject
One important thing to understand here is the meaning of self. The frontend method is a regular method that is available on instances of class Developer, but why is backend method a class method? Every piece of code executed in Ruby is executed against a particular self. When the Ruby interpreter executes any code it always keeps track of the value self for any given line. self is always referring to some object but that object can change based on the code executed. For example, inside a class definition, the self refers to the class itself which is an instance of class Class.
class Developer
  p self 
end
# Developer
Inside instance methods, self refers to an instance of the class.
class Developer
  def frontend
    self
  end
end
 
p Developer.new.frontend
# #<Developer:0x2c8a148>
Inside class methods, self refers to the class itself in a way (which will be discussed in more detail later in this article):
class Developer
  def self.backend
    self
  end
end

p Developer.backend
# Developer
This is fine, but what is a class method after all? Before answering that question we need to mention the existence of something called metaclass, also known as singleton class and eigenclass. Class method frontend that we defined earlier is nothing but an instance method defined in the metaclass for the object Developer! A metaclass is essentially a class that Ruby creates and inserts into the inheritance hierarchy to hold class methods, thus not interfering with instances that are created from the class.

METACLASSES

Every object in Ruby has its own metaclass. It is somehow invisible to a developer, but it is there and you can use it very easily. Since our class Developer is essentially an object, it has its own metaclass. As an example let’s create an object of a class String and manipulate its metaclass:
example = "I'm a string object"

def example.something
  self.upcase
end

p example.something
# I'M A STRING OBJECT
What we did here is we added a singleton method something to an object. The difference between class methods and singleton methods is that class methods are available to all instances of a class object while singleton methods are available only to that single instance. Class methods are widely used while singleton methods not so much, but both types of methods are added to a metaclass of that object.
The previous example could be re-written like this:
example = "I'm a string object"

class << example
  def example.something
    self.upcase
  end
end
The syntax is different but it effectively does the same thing. Now let’s go back to the previous example where we created Developer class and explore some other syntaxes to define a class method:
class Developer
  def self.backend
    "I am backend developer"
  end
end
This is a basic definition that almost everybody uses.
def Developer.backend
  "I am backend developer"
end
This is the same thing, we are defining the backend class method for Developer. We didn’t use self but defining a method like this effectively makes it a class method.
class Developer
  class << self
    def backend
      "I am backend developer"
    end
  end
end
Again, we are defining a class method, but using syntax similar to one we used to define a singleton method for a String object. You may notice that we used self here which refers to a Developer object itself. First we opened Developer class, making self equal to the Developer class. Next, we do class << self, making self equal to Developer’s metaclass. Then we define a method backend on Developer’s metaclass.
class << Developer
  def backend
    "I am backend developer"
  end
end
By defining a block like this, we are setting self to Developer’s metaclass for the duration of the block. As a result, the backend method is added to Developer’s metaclass, rather than the class itself.
Let’s see how this metaclass behaves in the inheritance tree:
Picture
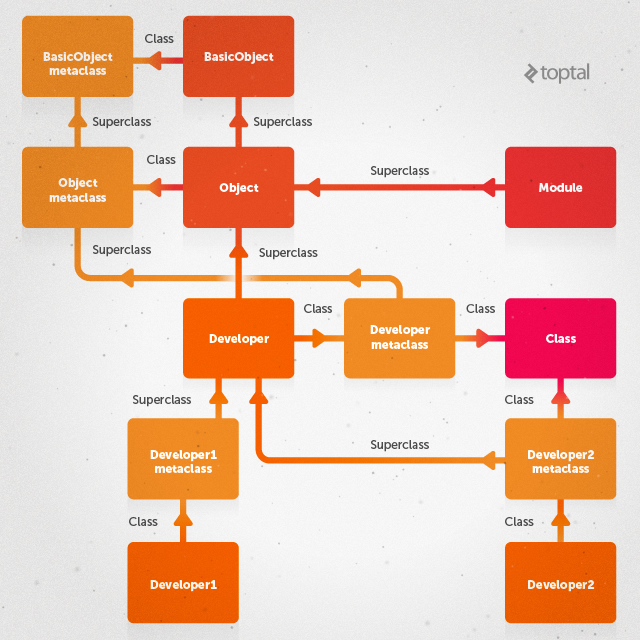
As you saw in previous examples, there’s no real proof that metaclass even exists. But we can use a little hack that can show us the existence of this invisible class:
class Object
  def metaclass_example
    class << self
      self
    end
  end
end
If we define an instance method in Object class (yes, we can reopen any class anytime, that’s yet another beauty of metaprogramming), we will have a self referring to the Object object inside it. We can then use class << self syntax to change the current self to point to the metaclass of the current object. Since the current object is Object class itself this would be the instance’s metaclass. The method returns self which is at this point a metaclass itself. So by calling this instance method on any object we can get a metaclass of that object. Let’s define our Developer class again and start exploring a little:
class Developer

  def frontend
    p "inside instance method, self is: " + self.to_s
  end

  class << self
    def backend
      p "inside class method, self is: " + self.to_s
    end
  end
  
end

developer = Developer.new
developer.frontend
# "inside instance method, self is: #<Developer:0x2ced3b8>"

Developer.backend
# "inside class method, self is: Developer"

p "inside metaclass, self is: " + developer.metaclass_example.to_s
# "inside metaclass, self is: #<Class:#<Developer:0x2ced3b8>>"
And for the crescendo, let’s see the proof that frontend is an instance method of a class and backend is an instance method of a metaclass:
p developer.class.instance_methods false
# [:frontend]

p developer.class.metaclass_example.instance_methods false
# [:backend]
Although, to get the metaclass you don’t need to actually reopen Object and add this hack. You can use singleton_class that Ruby provides. It is the same as metaclass_example we added but with this hack you can actually see how Ruby works under the hood:
p developer.class.singleton_class.instance_methods false
# [:backend]

DEFINING METHODS USING CLASS_EVAL AND INSTANCE_EVAL

There’s one more way to create a class method, and that is by using instance_eval:
class Developer
end

Developer.instance_eval do
  p "instance_eval - self is: " + self.to_s
  def backend
    p "inside a method self is: " + self.to_s
  end
end
# "instance_eval - self is: Developer"

Developer.backend
# "inside a method self is: Developer"
This piece of code Ruby interpreter evaluates in the context of an instance, which is in this case a Developer object. And when you are defining a method on an object you are creating either a class method or a singleton method. In this case it is a class method - to be exact, class methods are singleton methods but singleton methods of a class, while the others are singleton methods of an object.
On the other hand, class_eval evaluates the code in the context of a class instead of an instance. It practically reopens the class. Here is how class_eval can be used to create an instance method:
Developer.class_eval do
  p "class_eval - self is: " + self.to_s
  def frontend
    p "inside a method self is: " + self.to_s
  end
end
# "class_eval - self is: Developer"

p developer = Developer.new
# #<Developer:0x2c5d640>

developer.frontend
# "inside a method self is: #<Developer:0x2c5d640>"
To summarize, when you call class_eval method, you change self to refer to the original class and when you call instance_eval, self changes to refer to original class’ metaclass.

DEFINING MISSING METHODS ON THE FLY

One more piece of metaprogramming puzzle is method_missing. When you call a method on an object, Ruby first goes into the class and browses its instance methods. If it doesn’t find the method there, it continues search up the ancestors chain. If Ruby still doesn’t find the method, it calls another method named method_missing which is an instance method of Kernel that every object inherits. Since we are sure that Ruby is going to call this method eventually for missing methods, we can use this to implement some tricks.
define_method is a method defined in Module class which you can use to create methods dynamically. To use define_method, you call it with the name of the new method and a block where the parameters of the block become the parameters of the new method. What’s the difference between using def to create a method and define_method? There’s not much difference except you can use define_method in combination with method_missing to write DRY code. To be exact, you can use define_method instead of def to manipulate scopes when defining a class, but that’s a whole other story. Let’s take a look at a simple example:
class Developer
  define_method :frontend do |*my_arg|
    my_arg.inject(1, :*)
  end

  class << self
    def create_backend
      singleton_class.send(:define_method, "backend") do
        "Born from the ashes!"
      end
    end
  end
end

developer = Developer.new
p developer.frontend(2, 5, 10)
# => 100

p Developer.backend
# undefined method 'backend' for Developer:Class (NoMethodError)

Developer.create_backend
p Developer.backend
# "Born from the ashes!"
This shows how define_method was used to create an instance method without using a def. However, there’s much more we can do with them. Let’s take a look at this code snippet:
class Developer

  def coding_frontend
    p "writing frontend"
  end

  def coding_backend
    p "writing backend"
  end

end

developer = Developer.new

developer.coding_frontend
# "writing frontend"

developer.coding_backend
# "writing backend"
This code isn't DRY, but using define_method we can make it DRY:
class Developer

  ["frontend", "backend"].each do |method|
    define_method "coding_#{method}" do
      p "writing " + method.to_s
    end
  end

end

developer = Developer.new

developer.coding_frontend
# "writing frontend"

developer.coding_backend
# "writing backend"
That’s much better, but still not perfect. Why? If we want to add a new method coding_debug for example, we need to put this "debug" into the array. But using method_missing we can fix this:
class Developer

  def method_missing method, *args, &block
    return super method, *args, &block unless method.to_s =~ /^coding_\w+/
    self.class.send(:define_method, method) do
      p "writing " + method.to_s.gsub(/^coding_/, '').to_s
    end
    self.send method, *args, &block
  end

end

developer = Developer.new

developer.coding_frontend
developer.coding_backend
developer.coding_debug
This piece of code is a little complicated so let’s break it down. Calling a method that doesn’t exist will fire up method_missing. Here, we want to create a new method only when the method name starts with "coding_". Otherwise we just call super to do the work of reporting a method that is actually missing. And we are simply using define_method to create that new method. That’s it! With this piece of code we can create literally thousands of new methods starting with "coding_", and that fact is what makes our code DRY. Since define_method happens to be private to Module, we need to use send to invoke it.

WRAPPING UP

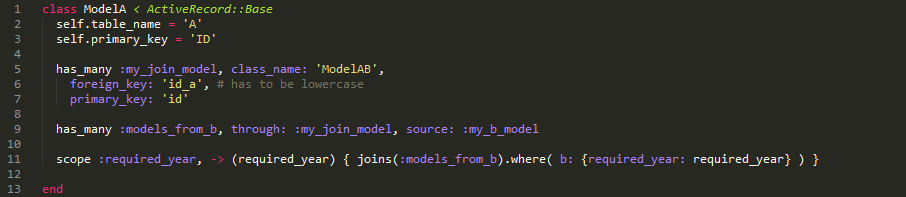
This is just the tip of the iceberg. To become a Ruby Jedi, this is the starting point. After you master these building blocks of metaprogramming and truly understand its essence, you can proceed to something more complex, for example create your own Domain-specific Language (DSL). DSL is a topic in itself but these basic concepts are a prerequisite to understanding advanced topics. Some of the most used gems in Rails were built in this way and you probably used its DSL without even knowing it, such as RSpec and ActiveRecord.
Hopefully this article can get you one step closer to understanding metaprogramming and maybe even building your own DSL, which you can use to code more efficiently.
1 Comment

RAILS 4 + ANGULARJS + JSON WEB TOKEN AUTHENTICATION

5/8/2015

3 Comments

 
Recently I was contacted by Toptal to join their network as a developer. I heard some good stuff about them before so I decided to give it a go. Toptal is "a network comprised of the most thoroughly screened, talented freelance engineers in the world". To enter the network you have to pass 4 tests. The first one is an interview - a simple English test, the second one is Codility test. The third one is a one-to-one test with a senior developer from the network when you need to solve two problems at limited time. And the last one is to create a full application.
Anyway, I am not going to talk about Toptal, rather than the project they gave me to do as the last part of the screening process. The full text of the project as well as the solution you can find on my GitHub. In this post I will only go through the main things and make some general remarks how development should be done and what you should pay attention, I won't cover every detail because there is too much code. For all the details you have code on GitHub.

Authentication

Since I needed to create API with every operation done using JavaScript I decided to use Angular to create a SPA. And since there is an API and SPA I decided to authenticate users using tokens. I didn't want to use Devise since the basic gem doesn't offer token authentication and then you need to add some other gem to be able to do that so I decided to use so called JWT (JSON web token). More about that technology you can find here.
require 'jwt'

module AuthToken
  def AuthToken.issue_token(payload)
    payload[:exp] = Time.now.to_i + 4 * 3600
    JWT.encode payload, Rails.application.secrets.secret_key_base
  end

  def AuthToken.valid?(token)
    begin
      JWT.decode token, Rails.application.secrets.secret_key_base
    rescue
      false
    end
  end
end
Token generation, encoding and decoding is very simple using existing ruby gem. Only thing you need to do is gather everything in a whole. The general idea when user needs to be authenticated is to generate an API call with the parameters of email and password. If it turns out that this is the valid user, the token is being generated and returned to the user as a JSON response. That response also contains a data what user it is (user_id). The whole token is saved in the browser's local storage. Instead, a token can be stored in a cookie (therefore cookie is used as a storage), more about that you can find on this link.
class AuthController < ApplicationController
  require 'auth_token'

  layout false

  def register
    @user = User.new(user_params)
    if @user.save
      @token = AuthToken.issue_token({ user_id: @user.id })
    else
      render json: { errors: @user.errors }, status: :unauthorized
    end
  end

  def authenticate
    @user = User.find_by(email: params[:email].downcase)
    if @user && @user.authenticate(params[:password])
      @token = AuthToken.issue_token({ user_id: @user.id })
    else
      render json: { error: "Invalid email/password combination" }, status: :unauthorized
    end
  end

  def token_status
    token = params[:token]
    if AuthToken.valid? token
      head 200
    else
      head 401
    end
  end

  private

    def user_params
      params.permit(:first_name, :last_name, :email, :password)
    end
    
end
Then, each time the client sends a request to the API, the token is being added to the header of that request. To do this, an interceptor is created on Angular side which intercepts each request and does this part of the job.
@topTalApp.factory('AuthInterceptor', ($location, $rootScope, $q, $injector) ->
  
  authInterceptor = {

    request: (config) ->
      token = undefined
      if localStorage.getItem('auth_token')
        token = angular.fromJson(localStorage.getItem('auth_token')).token
      if token
        config.headers.Authorization = 'Bearer ' + token
      config

    responseError: (response) ->
      if response.status == 401
        localStorage.removeItem 'auth_token'
        $rootScope.errorMsg = response.data.error
        $location.path '/login'
      if response.status == 403
        $rootScope.errorMsg = response.data.error
        $location.path '/'
      $q.reject response

  }
  
  authInterceptor

).config ($httpProvider) ->
  $httpProvider.interceptors.push 'AuthInterceptor'
  return
On the API side, the token is being extracted from the header of that request and checked whether it is valid (the expiration time is being set on the token). If it is valid than user_id is being used to get data for current_user. If token is invalid or there isn't any token, API returns http code 401 - which prevents unauthorized access to the API if someone is not authenticated...
module Api
  class BaseController < ApplicationController
    require 'auth_token'

    before_action :authenticate

    # jbuilder needs this
    layout false

    private

      def authenticate
        begin
          token = request.headers['Authorization'].split(' ').last
          payload, header = AuthToken.valid?(token)
          @current_user = User.find_by(id: payload['user_id'])
        rescue
          render json: { error: 'You need to login or signup first' }, status: :unauthorized
        end
      end

  end
end
And let's not forget about routes. This is how I defined routes. This is pretty straightforward but if you need some extra explanation about it you can find an excellent RailsCast episode about APIs.
Rails.application.routes.draw do
  root 'home#index'

  namespace :api, defaults: {format: :json} do
    resources :users, except: [:new, :edit]
    resources :expenses, except: [:new, :edit] do
      collection do 
        get :weekly
      end
    end
  end

  post '/auth/register', to: 'auth#register', defaults: {format: :json}
  post '/auth/authenticate', to: 'auth#authenticate', defaults: {format: :json}
  get '/auth/token_status', to: 'auth#token_status', defaults: {format: :json}

end

Authorization

Authorization is certainly another important thing in every application but unfortunately it is something that is not paying too much attention. Of course, everyone has their own idea of how authorization should be implemented and I don't think there is any general best practice but I think that this approach, which I applied here, is more than good. It is necessary to do authorization on the API side and also in the web application. On API side because calls can be directed only to an API without any application involved and within application users without enough permissions should be forbidden access to the certain parts of the application as well as the forms for inserting new data.
I defined three types of user in the application - regular user, admin and user manager. A regular user has permission to only list her expenses and to create them, user manager has the right to list all the users in the application, edit them and create a new one, admin has the right to create expenses for herself and to list and edit expenses of all users in the system as well as to create new and edit existing users.
class User < ActiveRecord::Base

  has_secure_password

  validates :email, :password_digest, presence: true
  validates :email, uniqueness: { case_sensitive: false }
  
  validates :password, length: { minimum: 5 }

  has_many :expenses
  
  belongs_to :role

  ROLES = {
    REGULAR: 1,
    ADMIN: 2,
    MANAGER: 3
  }

  def is_regular
    self.id_role == ROLES[:REGULAR]
  end

  def is_admin
    self.id_role == ROLES[:ADMIN]
  end
  
  def is_manager
    self.id_role == ROLES[:MANAGER]
  end

end

- Api

I didn't want to use Cancancan or Pundit or similar gems because I wanted to save myself some time and the authorization on the API is more than simple. All you have to do is to create a before_action filter and each controller then has to define who has the right to access the actions within it. If someone doesn't have permissions then you need to return http code :forbidden. This of course can't be tested in the application but there are tests you can write to check if everything is fine.
module Api
  class UsersController < Api::BaseController
    before_action :is_authorized?

    private

      def is_authorized?
        if @current_user.is_regular
          render json: { error: "Doesn't have permissions" }, status: :forbidden
          return
        end
      end

  end
end

- Angular

Angular part is a little more complex... First you should remove links from menu if certain user doesn't have permissions and then you should also disable the possibility for the same users to manually enter routes in the browser, which would allow them to visit those pages. It is pretty much easy to disable links in the menu but to do the other part you need to put some more effort in it. The most important part can be found in the file angular/services/auth.coffee:
@topTalApp.factory 'Auth', ['$http', 'CurrentUser', 'ROLES', ($http, CurrentUser, ROLES) ->

  currentUser = CurrentUser

  token = localStorage.getItem('auth_token')

  {
    isRegularUser: (user) ->
      user.getRole() == ROLES.REGULAR

    isAdminUser: (user) ->
      user.getRole() == ROLES.ADMIN

    isManagerUser: (user) ->
      user.getRole() == ROLES.MANAGER

    isAuthorized: (permissions) ->
      i = 0
      while i < permissions.length
        switch permissions[i]
          when 'REGULAR'
            return true if currentUser.getRole() == ROLES.REGULAR
          when 'ADMIN'
            return true if currentUser.getRole() == ROLES.ADMIN
          when 'MANAGER'
            return true if currentUser.getRole() == ROLES.MANAGER
        i += 1
      return false
  }

]
Then, you should listen to a $routeChangeStart event and disable access to a page if user doesn't have needed permissions. The code is in the file angular/app.coffee:
@topTalApp = angular.module('topTalApp', ['ngRoute', 'rails', 'templates', 'ui.bootstrap', 'sy.bootstrap.timepicker', 'angularUtils.directives.dirPagination'])

@topTalApp

  .run [
    '$rootScope'
    '$location'
    'Auth'
    ($rootScope, $location, Auth) ->
      $rootScope.$on '$routeChangeStart', (event, next, current) ->
        if next.access != undefined and !Auth.isAuthorized(next.access.requiredPermissionsAnyOf)
          if next.templateUrl == 'expenses/expenses.html' and Auth.isAuthenticated() != null
            $location.path '/users'
          else if next.templateUrl == 'expenses/expenses.html' and Auth.isAuthenticated() == null
            $location.path '/login'
          else
            $location.path '/'
        return
      return
  ]
  
  .config(
    ($routeProvider) ->
    
      $routeProvider
        .when '/signup', {templateUrl: 'sessions/signup.html', controller: 'SignupCtrl'}
        .when '/login', {templateUrl: 'sessions/login.html', controller: 'LoginCtrl'}

        .when '/', {
          templateUrl: 'expenses/expenses.html',
          controller: 'ExpenseCtrl',
          access: requiredPermissionsAnyOf: [ 'REGULAR', 'ADMIN' ]
        }

        .when '/expenses', {
          templateUrl: 'expenses/expenses.html',
          controller: 'ExpenseCtrl',
          access: requiredPermissionsAnyOf: [ 'REGULAR', 'ADMIN' ]
        }

        .when '/new_expense', {
          templateUrl: 'expenses/new_edit_expense.html',
          controller: 'ExpenseCtrl',
          access: requiredPermissionsAnyOf: [ 'REGULAR', 'ADMIN' ]
        }

        .when '/expense/:id', {
          templateUrl: 'expenses/new_edit_expense.html',
          controller: 'ExpenseCtrl',
          access: requiredPermissionsAnyOf: [ 'REGULAR', 'ADMIN' ]
        }

        .when '/expenses/weekly', {
          templateUrl: 'expenses/weekly.html',
          controller: 'ExpenseWeeklyCtrl',
          access: requiredPermissionsAnyOf: [ 'REGULAR', 'ADMIN' ]
        }

        .when '/users', {
          templateUrl: 'users/users.html',
          controller: 'UserCtrl',
          access: requiredPermissionsAnyOf: [ 'MANAGER', 'ADMIN' ]
        }

        .when '/new_user', {
          templateUrl: 'users/new_edit_user.html',
          controller: 'UserCtrl',
          access: requiredPermissionsAnyOf: [ 'MANAGER', 'ADMIN' ]
        }

        .when '/user/:id', {
          templateUrl: 'users/new_edit_user.html',
          controller: 'UserCtrl',
          access: requiredPermissionsAnyOf: [ 'MANAGER', 'ADMIN' ]
        }

        .otherwise({redirectTo: '/'})

  )
I think this is more than elegant solution for authorization. The whole code you can find on GitHub as I mentioned before.

Rails API

When you set up the basics of the application with authentication and authorization then you must set up the API part of the Rails. There is an excellent RailsCast about it and many tutorials online so I won't go into details. Of course, you can use Grape instead of Rails but I decided to stick with Rails because I've never before worked with Grape and I wanted to save time on this part too. The thing you have to keep in mind are the routes and the fact that each API call must return JSON response. You can use active model serializer or Jbulder or you can even go without that of course. But I used Jbulder because you definitely need an easy way to properly create JSON you want to return to the user that made the request. Again I have to mention that you have a great RailsCast episode how to use Jbuilder so I won't write on this topic further.

Angular app

This was a new ground for me, I've never built a SPA before but for two weeks how long did this project last I am very satisfied with what I've achieved. There are several ways to integrate your Rails API with Angular application. Again I chose the simplest option, although probably not the best. I used Angular gem. I think that in a bigger project the best way is to completely separate API part of its SPA part and not use this gem but in this situation it served the purpose really well.
I won't post pieces of the code here because you have a whole project on GitHub, but I would like to note that I used Slim for making templates, CoffeeScript instead of a plane JavaScript because I like cleaner code and I used Bootstrap too. I made a couple of filters in order to extract information about date and time from the column in the database that stores datetime together for nicer display. Everything else is pretty straightforward.

Timezone

The part of the project that I had the most headache is the part with printing data for expenses arranged by weeks. Why was this such a big problem? As I wrote in a previous blog post, it's very important how you work with time zones in your application. The best practice is to store everything in UTC time in the database. When a user enters a date and time in the form (her local time) you have to store that time in the UTC format in the database and then when you need to display that time to the user you have to convert it back into her local time. Pretty standard stuff... Except for one little thing - the requirement is to display expenses arranged by weeks and by weeks it's meant from the user's perspective. From user's perspective a week isn't the same as a week on the server which is in UTC time. So, you have to deal with UTC time because you have to prepare JSON response in your API but in the same time you have to deal with user's local time (starting and ending of the week) and arrange JSON response according to that. If a user is, for example, in Belgrade (CET) and if she inserts an expense for Monday, July 27th at 1 AM it would be 31st week of the year according to her. But by the server's time, it is Sunday July 26th at 11 PM, which means it is 30th week for the UTC time. I solved this problem by sending time zone offset as a parameter to the API and by adding it to a time I stored in the database. You must also pay attention to the edge cases when you calculate weeks when start of a week is in one year and its ending is in the next year.
def weekly
  expenses = findByDateFromAndTo params[:datefrom], params[:dateto], :asc
  my_json = {}

  add_minutes =  - params[:timezone].to_i.minutes

  expenses.each do |expense|
    year, month, week = (expense.for_timeday + add_minutes).strftime('%Y'), (expense.for_timeday + add_minutes).strftime('%m'), (expense.for_timeday + add_minutes).strftime('%V')
    year = (year.to_i + 1).to_s if month.to_i == 12 && week.to_i == 1
    key = year + '.' + week

    analytics = my_json[key] || {}
    analytics[:expense] = analytics[:expense] || []
    analytics[:total] = expense.amount + (analytics[:total] || 0)
    analytics[:items] = 1 + (analytics[:items] || 0)
    analytics[:start] = Date.commercial(year.to_i, week.to_i, 1).to_s
    analytics[:end] = Date.commercial(year.to_i, week.to_i, 7).to_s

    my_expense = {for_timeday: expense.for_timeday, amount: expense.amount, description: expense.description, comment: expense.comment}
    analytics[:expense].push my_expense

    my_json[key] = analytics
  end

  render json: my_json.values
end

TestS

Last but not least - tests! Writing tests is very important and you shouldn't neglect it even if you have tight deadline. I did lot more here than it was expected from me but unfortunately I didn't have time to write tests for JavaScript, but the procedure is pretty standard... I used Factory Girl and Faker to create data and also Database Cleaner to clean data after running tests.
FactoryGirl.define do

  factory :expense do
    
    association :user, factory: :user_regular

    amount { Faker::Commerce.price }
    for_timeday { Faker::Time.between(100.days.ago, 1.day.ago) }
    description { Faker::Lorem.sentence }
    comment Faker::Lorem.sentence

    trait :future_time do
      for_timeday { Faker::Time.forward(5, :all) }
    end

    factory :expense_future, traits: [:future_time]

  end

end
Next, you should write unit tests - tests for models, since this is not a big database there is only two models to test, user and expense:
require 'rails_helper'

describe Expense do

  it 'has a valid factory' do
    expect(build(:expense)).to be_valid
  end

  it 'is invalid without an amount' do
    expect(build(:expense, amount: nil)).to_not be_valid
  end

  it 'is invalid without a description' do
    expect(build(:expense, description: nil)).to_not be_valid
  end

  it 'is invalid without a time' do
    expect(build(:expense, for_timeday: nil)).to_not be_valid
  end

  it 'is invalid with a time set in the future' do
    expect(build(:expense_future)).to_not be_valid
  end

  it 'should belong to a user' do
    expense = build(:expense)
    user = build(:user)
    expense.user = user
    expect(expense.user).to be user
  end

end
And finally functional tests - for testing your controllers. I am especially proud of this part of the application since I covered entire API - authentication, authorization as well as creating expenses, users and so on...
require 'rails_helper'

describe AuthController do

  # because of the jBuilder I need to render views
  render_views

  describe 'POST #register' do

    context 'with valid credentials' do

      it 'returns user id' do
        #build a user but does not save it into the database
        user = build(:user_regular)
        post :register, { email: user.email, password: user.password, format: :json }
        expect(response.status).to eq 200
        parsed_response = JSON.parse response.body
        expect(parsed_response['user']['id']).to_not be_nil
      end

    end

    context 'with invalid credentials' do

      it 'does not have email' do
        post :register, { password: "pass", format: :json }
        expect(response.status).to eq 401
        parsed_response = JSON.parse response.body
        expect(parsed_response['errors']).to_not be_nil
        expect(parsed_response['errors']['email'][0]).to eq "can't be blank"
      end

      it 'does not have password' do
        post :register, { email: "[email protected]", format: :json }
        expect(response.status).to eq 401
        parsed_response = JSON.parse response.body
        expect(parsed_response['errors']).to_not be_nil
        expect(parsed_response['errors']['password'][0]).to eq "can't be blank"
      end

    end

  end


  describe 'POST #authenticate' do

    context 'with valid credentials' do

      it 'returns token' do
        user = create(:user_regular)
        post :authenticate, { email: user.email, password: user.password, format: :json }
        expect(response.status).to eq 200
        parsed_response = JSON.parse response.body
        expect(parsed_response['token']).to_not be_nil
      end

      it 'returns token with 3 parts separated by comas' do
        user = create(:user_regular)
        post :authenticate, { email: user.email, password: user.password, format: :json }
        expect(response.status).to eq 200
        parsed_response = JSON.parse response.body
        expect(parsed_response['token'].split('.').count).to eq 3
      end

      it 'returns first name and last name of the user' do
        user = create(:user_regular)
        post :authenticate, { email: user.email, password: user.password, format: :json }
        expect(response.status).to eq 200
        parsed_response = JSON.parse response.body
        expect(parsed_response['user']['first_name']).to eq user.first_name
        expect(parsed_response['user']['last_name']).to eq user.last_name
      end

    end

    context 'with invalid credentials' do

      it 'does not return token' do
        user = create(:user_regular)
        post :authenticate, { email: "no_" + user.email, password: user.password, format: :json }
        expect(response.status).to eq 401
      end

    end

  end

  describe 'POST #token_status' do

    context 'with valid token' do

      it 'returns OK code' do
        user = create(:user_regular)
        token = AuthToken.issue_token({ user_id: user.id })
        post :token_status, { token: token, format: :json }
        expect(response.status).to eq 200
      end

    end

  end

end
Again, the rest of the code you can find on GitHub :)

The end

If you are a great developer and you want to try yourself to do some similar project, and if you want to work for the Toptal as a freelance developer, to fulfill your dreams to work from home or some exotic island you can sign up here, I enjoyed participating in such a process of selection of candidates.
3 Comments

RAILS 4 + POSTGRESQL + TIMEZONE BEST PRACTICE

15/3/2015

2 Comments

 
Suppose we have a Rails application and we are using Postgresql as a database. There is always a question of what is the best way to deal with the time zones in this situation. In most cases that won't be of any importance, but if you have users from around the world and they need to know the exact point in time when something happened (banking transactions), then it is extremely important that you have time zones properly set in the application and on the server.

Prerequisite

Let's start with a simple create script that we want to execute on the database server (you could use migrations in Rails, but I want to have a full control over the database so I like it this way):
 
CREATE EXTENSION "uuid-ossp";

CREATE TABLE TESTINGS (
ID UUID PRIMARY KEY DEFAULT uuid_generate_v4(),
NAME VARCHAR(500) NOT NULL,
DESCRIPTION VARCHAR(500),
TESTING_TIME_1_AT TIMESTAMP WITH TIME ZONE NOT NULL DEFAULT NOW(),
TESTING_TIME_2_AT TIMESTAMP WITH TIME ZONE
);
Here we have two columns of type TIMESTAMP, you should always put your timestamp columns to be WITH TIME ZONE, there's no need to store time without time zone because you won't gain anything with it, but you could lose a lot even you don't need time zones. After you execute this script, you should create a model in your Rails application according to the table (testing.rb). Now let's begin to play with it.

Timezone on postgresql server

I suppose that you already installed your Postgresql server. If so, first you should check which time zone is set on the server with this command:
 
show timezone;
If the server isn't set to UTC time zone, you should do that by going to the file postgresql.conf. Locate timezone variable and change it to UTC (timezone = 'UTC'). Save the file, restart your server and check again with that command that the time zone is properly changed. By the way, this file is located under the path '\PostgreSQL\9.4\data' (if you have 9.4 version installed).
If, for some reason, you wish to configure different time zone on your server, be sure to set that same time zone inside your Rails application.

Timezone in rails application

In your Rails application, if you open file 'config/application.rb', you could see that the default time zone for the application is set to UTC, and you should leave it that way. But if you set different time zone on your Postgresql server, than you should set that same time zone in here. You can use this command to see which time zones are available in Rails:
 
$ rake time:zones:all
And this you can use to see the time zone which is set on your system, not in the application:
 
$ rake time:zones:local

Handling timezones

If you start your Rails console and type this:
 
$ test1 = Testing.create(name: 'Test1')
In your database you will create a data which will have for TESTING_TIME_1_AT current time in the UTC format, because previously you set your database to UTC and also you specified default value for this column. And if you do this:
 
$ test2 = Testing.create(name: 'Test2', testing_time_2_at: '2015-03-13 2pm')
You will create a data with TESTING_TIME_2_AT also set in the UTC format. But if you do this:
 
$ Time.zone = ActiveSupport::TimeZone.new('Belgrade')
$ test3 = Testing.create(name: 'Test3', testing_time_2_at: '2015-03-13 2pm')
You will change time zone in your Rails application so TESTING_TIME_2_AT will be set to time you entered but converted into UTC, because of the database, therefore '2015-03-13 13:00:00+00' if you do SELECT on the table.
Before we continue, one thing is important to notice. When one specific event occurs, time of that event is absolute, not relative, it's exactly one point in time. So if you have that point in time you can convert that time across different time zones. That's why it is important to store time zones in your database. If you don't do that, you won't have correct data when that event occurred because without time zone specified, that event might occur anytime during that day. If you have time in your database set to '2015-03-13 2pm' for example, you won't know what is the absolute time of that event regardless that hour of the day is entered. You won't know if that is London's time or Moscow's time...
You should try now to execute commands Time.now and Time.zone.now and you'll probably find yourself even more wondering what the hell is happening here. This is the explanation:
Time.now - gives you the time in system time zone, this is provided by Ruby and it doesn't know anything about our timezone configuration we just set.
Time.zone.now - is provided by Rails and gives you Time.zone value that we set in Rails.
Now type this:
 
$ test4 = Testing.create(name: 'Test4', testing_time_2_at: Time.now)
$ test5 = Testing.create(name: 'Test5', testing_time_2_at: Time.zone.now)
You might be surprised that inside your database you will get the same time for TESTING_TIME_2_AT in these two cases, not different one like you might think. This is fun, isn't it :) The catch here is that we set UTC time inside of the database and there is only one correct time IN THIS CURRENT MOMENT, not two, regardless which NOW method you use.
Since you are probably not in Honolulu, let's do this:
 
$ Time.zone = ActiveSupport::TimeZone.new('Pacific/Honolulu')
$ test6 = Testing.create(name: 'Test6', testing_time_2_at: Time.zone.parse('2015-03-14 8pm'))
Now when you select your data from the database, you'll get '2015-03-15 06:00:00+00' for TESTING_TIME_2_AT. That means that you inserted data with time zone from Honolulu and Postgresql converted it into UTC time which is 10 hours behind the UTC time zone. So when it's 8 pm in Honolulu on 14th of March, in London it will be 6 am on 15th of March, so we got everything right, we have exactly one point in time correctly inserted into our database.
Let's try something more here:
test6.testing_time_2_at = 'Sat, 14 Mar 2015 20:00:00 HST -10:00' - this gives time in time zone which is set in the Rails application.
test6.testing_time_2_at.localtime = '2015-03-15 07:00:00 +0100' - this gives time in local time zone, I am in Belgrade.
test6.testing_time_2_at.in_time_zone("Eastern Time (US & Canada)") = 'Sun, 15 Mar 2015 02:00:00 EDT -04:00' - you can convert time from database into any time zone you wish.

Wrap up

1) If you need to know a point in time when some event occurred then it isn't relevant what type of time zone you forward to the database because the database is set to the UTC time zone and it will always store time in UTC format, therefore you will have infallible data about time. The example is when you create a record in the database and time zone isn't important to the user of your application, you can forward Time.now or Time.zone.now to the database, it doesn't matter.
2) If it is important to store local time when user did some action to show it later to her, again it isn't important which time zone you forward to the database because in the database there will be set exact UTC time of that event. But when you need to show that time to the user, you need to convert it into local time for that user (for example, the time when some banking transaction occurred).
3) If user chooses a time inside of the application (for example you are building an application which sends some sort of notification to the users at the moment they defined), this is the case you need to take care of local time. Because if you don't do that, and user chooses time '2143-07-13 2pm', one day that distant year 2143 the user will receive the notification in the London timezone instead of the time that is valid in Honolulu. For this reason you need to forward to the database Time.zone.parse('2143-07-13 2pm'). It will be converted to UTC format and when you display that data to the user, you will manually convert that time into local time.
4) If you need to work on the procedures in the database, you'll always work with UTC time since every data is stored in UTC time zone, so no need to worry about converting into different time zones.

How to know the time zone of the user

One more thing you have to do to solve all problems with time zone settings is how to display that time for the user who uses your application. Since the time in your database is always in UTC format and your users can be anywhere in the world, you have to know the time zone of the person who uses your application. You can do that in two ways:
1) On the client side, using JavaScript or installing a gem that does that for you. Personally I don't like this way.
2) On the server side, take the user's location and based on that you can find the time zone. You can use gems like geocoder and timezone. Here you can have a problem if someone uses your application through a proxy, but these are borderline cases that doesn't happen often. Though if that can happen to you, in this case it is better to use client side approach with JavaScript because that data will be infallible (except if the time on that computer is incorrectly set).
Of course, you can always ask the user in a form to choose the time zone to which she belongs, so this information could be stored in the database as a user preference but that way the application loses quality because you ask a user something that you don't need to ask. This information can be obtained in a different way and thus free your user of unnecessary entries which drastically improves UX of your application.

The end

Certainly there are other ways how you can deal with time zones in your application, but I personally prefer to do it this way. However, if you work in this way or another, do not forget that the convention for working with time zones is very important when you build any application. You, as a developer, need to think of every single detail in the architecture of your system.
2 Comments

RAILS 4 + DATATABLES 1.10 + AJAX

10/12/2014

7 Comments

 
DataTables is a great tool which you can use to easily manipulate with tables in your web apps by adding pagination, sorting and searching through JavaScript. But if you need to manipulate with a table which has thousands of records you need to use server side processing and that can be a little difficult to accomplish in the right way. There is a great railscast episode about this but it's out of date since DataTables changed a lot since then. There is also a gem that you can use to solve this problem but it doesn't support Oracle and I had a hard time configuring it in a way that I needed to, so I decided to do it by myself from scratch but based on code provided in Ryan Bytes' episode.

A PROBLEM

Let's say you need to create an index page with products listed in a table with search bar on top and you need to use submitted search parameters to search for records in your database by product code and product name. Btw, I used Spawner Data Generator to generate enough records so I can test server side processing properly.
Picture

General information

For this purpose we will be using rails 4 with HAML, CoffeScript, Zurb Foundation as front-end framework, kaminari for pagination and Font Awesome for icons, so you need to configure your gemfile to include all of these. Don't forget to run 'bundle install':
 
source 'https://rubygems.org'

gem 'rails', '4.0.4' # Bundle edge Rails instead: gem 'rails', github: 'rails/rails'
gem 'sass-rails', '~> 4.0.2' # Use SCSS for stylesheets
gem 'coffee-rails', '~> 4.0.0' # Use CoffeeScript for .js.coffee assets and views

gem 'jquery-rails' # Use jquery as the JavaScript library
gem 'jquery-ui-rails' # JQuery UI Library
gem 'jquery-datatables-rails' # Use datatables as default tables in the application
gem 'font-awesome-rails' # Icons

gem 'activerecord-oracle_enhanced-adapter', '~> 1.5.0' # Oracle database adapter
gem 'ruby-oci8' # Ruby interface for Oracle using OCI8 API
gem 'foundation-rails' # zurb foundation
gem 'simple_form' # Simple form builder
gem 'haml-rails' # Use haml processing in views
gem 'kaminari' # Pagination

gem 'turbolinks' # Turbolinks makes following links in your web application faster
gem 'jquery-turbolinks'

gem 'thin'
gem 'thin_service'
Also, don't forget to change your application.css and application.js files:
 /* 
*= require font-awesome
*= require_self
*= require foundation_and_overrides
*= require dataTables/jquery.dataTables.foundation

*= require_tree .
*/
 
//= require jquery
//= require jquery.turbolinks
//= require jquery_ujs
//= require foundation
//= require dataTables/jquery.dataTables
//= require dataTables/jquery.dataTables.foundation
//= require turbolinks
//= require_tree .

Models

Let's assume we have Category model (code, name) and Product model (code, name, description, category), so Product model has one 'belongs_to' association and we need to put category name in product table on our index page. I won't post code that represents these models since there would be too much code in this post and it is very easy to code this.

INDEX page, CONTROLLER, ROUTES, JAVASCRIPT

Now let's get to the point... In your index page you need to wrap the header row inside a thead element and the body section in a tbody element. Nothing more than that since you are going to render records after you get them from the server. I added one additional column here - ID of the record which we won't display but it is fun to add more tricks to the code and you can later use it to select a row from a table and do something with it. Additionally, there is a search field where user can enter some text to search by product code or name. Later we will see how we are going to use this.
 
.row
.medium-12.columns

= form_tag products_index_path, method: 'get' do
.row
.medium-4.columns
%b Product code:
= text_field_tag :product_code, params[:product_code]
.medium-4.columns
%b Product name:
= text_field_tag :product_name, params[:product_name]
.medium-4.columns

.row
.medium-2.columns
= button_tag type: 'submit', style: 'color:#FFFFFF;', class: 'button tiny expand' do
%i.fa.fa-search.fa-lg
.medium-10.columns

.row
.separator

%br

.medium-12.columns

%table#product_table
%thead
%tr
%th{style: 'display: none'} ID
%th Code
%th Name
%th Description...
%th Category
%th
%th
%th
%tbody
Another thing we need to do in this step is to add some code to the controller and to configure routes:
 class ProductsController < ApplicationController 

def index

end

def datatable_ajax
render json: ProductsDatatable.new(view_context)
end
 Test::Application.routes.draw do 

resources :products

get 'products_ajax/datatable_ajax', to: 'products#datatable_ajax'

end
As you can see, the index action is empty. I didn't want to put code for fetching records for DataTables here since index action simply isn't for that. In index action you want to do something with the page in general and data in the page, for example fetch some other data besides data for the table. For that reason, we created separate action just for that purpose and that action will return just json, nothing else. The last thing in this step is to create products.js.coffee file where we can tell DataTables all information about the table and server side processing:
 $ -> 
product_table = $('#product_table').DataTable
processing: true
serverSide: true
ajax:
url: '/products_ajax/datatable_ajax'
data: (d) ->
d.product_code = $('#product_code').val()
d.product_name = $('#product_name').val()
return
columns: [
{ width: "0%", className: "dont_show", searchable: false, orderable: false }
{ width: "15%" }
{ width: "35%", className: "row_config" }
{ width: "null", className: "row_config", searchable: false, orderable: false }
{ width: "5%", className: "center", searchable: false, orderable: false }
]
order: [ [1,'asc'] ]
You can arrange your columns as you wish, I did it in this way. There is a class name for the first column since we don't want to display column with ID, so you need to add some CSS in here, for example in products.css.scss file. 'row_config' class name tells to each table cell that if content in that cell is too long, the content won't be broken in additional lines - the content will be displayed in that cell as is, with dots (...) if content is longer. In that way you keep your table well formatted.
 
.row_config {
max-width: 200px;
text-overflow: ellipsis;
white-space: nowrap;
overflow: hidden;
}

.dont_show {
display: none;
}
One more thing - we will send additional parameters via DataTable using this 'data' part, You can send as much additional parameters as you like. So, when you perform some action on the table, DataTables will collect other information from the page and send them to the url you defined.

AJAX PART

And finally, here is the main part of the application. In this section we will perform everything needed to fetch, prepare and display data in a proper way:
 class ProductsDatatable 
delegate :params, :fa_icon, :link_to, :products_path, :edit_products_path, to: :@view

def initialize(view)
@view = view
end

def as_json(options = {})
{
data: data,
recordsTotal: my_search.count,
recordsFiltered: sort_order_filter.count
}
end

private

def data
products = []
display_on_page.map do |record|
product = []
product << record.id
product << record.code
product << record.name
product << record.description
product << (record.category.present? ? record.category.name : '')
product << link_to(fa_icon('info-circle lg'), products_path(record), class: 'label success round')
product << link_to(fa_icon('edit lg'), edit_products_path(record), class: 'label secondary round')
product << link_to(fa_icon('trash-o lg'), products_path(record), method: :delete, data: { confirm: 'Are you sure?' }, class: 'label alert round')
products << product
end
products
end

def my_search
@filtered_products = Products.filter_product_code(params[:product_code]).filter_product_name(params[:product_name]).some_additional_scope.distinct.includes(:category)
end

def sort_order_filter
records = my_search.order("#{sort_column} #{sort_direction}")
if params[:search][:value].present?
records = records.where("PRODUCTS.CODE like :search or lower(PRODUCTS.NAME) like :search", search: "%#{params[:search][:value]}%")
end
records
end

def display_on_page
sort_order_filter.page(page).per(per_page)
end

def page
params[:start].to_i/per_page + 1
end

def per_page
params[:length].to_i > 0 ? params[:length].to_i : 10
end

def sort_column
columns = %w[not_orderable PRODUCTS.CODE lower(PRODUCTS.NAME) not_orderable not_orderable]
columns[params[:order][:'0'][:column].to_i]
end

def sort_direction
params[:order][:'0'][:dir] == "desc" ? "desc" : "asc"
end
end
This file is too long to explain every single detail, but you can use railscast episode as a guide. Also, you can notice that you need to define scopes in your Product model class and use it to filter data according to the parameters submitted by the user. The scope can be defined in this way for example:
 scope :filter_product_name, -> (product_name) {where("lower(PRODUCTS.NAME) like :search", search: "%#{product_name.downcase}%")} 
You maybe noticed that I use LOWER function a lot. It's Oracle's function you can use to down-case your string, so search can be performed regardless of the way user entered search parameter. You can also use this when you specify sort columns as shown above. I am not sure if you can customized your searches and sorts in this way using gem I mentioned in the beginning.

THE END

I hope this helps a little. It's pretty easy to configure your table with DataTables if you know the basics, but for beginners it can be really hard to collect all the pieces and make a functional solution.
7 Comments

RAILS 4 + HAS_MANY THROUGH + FOREIGN KEYS + SCOPE

10/10/2014

0 Comments

 
If you are dealing with a legacy database with weird names of tables and keys that don't follow rails practice for table naming than you will probably have a problem figuring out how to connect all the dots of your application. On top of that if you have to deal with "many-to-many" relation than you have a real tough task to accomplish. So let's go over one example how you can deal with this problem with ease.

A PROBLEM

Let's say you have a database table 'A(ID)', a table 'B(ID)' and a table 'AB(ID, ID_A, ID_B)'. 'A' has many of B's and 'B' has many of A's so 'AB' is a join table. You have to create models with the same names as database tables (in rails your database table name should be plural and your model should be singular so this is one more problem for you). And on top of that you need to create a scope in model 'A' to get data from table 'A' but you need to use some columns from table 'B'. For example (just to make you clear what we need to do) you have patients, physicians and appointments. And you have to find all physicians that have patients born in 1974. So in our example in table 'B' you would have one more column 'REQUIRED_YEAR'.

MODELS

Now that we defined our problem we can start developing our models:
Picture
Picture
Picture
As you can see, there are a lot of tricks in here, so be careful about every single line of code. Regardless of the rails naming conventions I always put 'class_name', 'foreign_key' and 'primary_key' options when I define a has_many or belongs_to associations. Maybe it's a few extra characters of code but I feel a lot safer not thinking what rails is doing 'under the hood' connecting names of the associations with model names.

A SCOPE

And finally let's create a scope in 'ModelA' to get all the data from table 'A' where a record from 'A' is connected to 'B' through 'AB' with a required year of 2012. Next image is a complete 'ModelA':
Picture
Now from console you can simply call:
Picture
Corresponding SQL query that is generated:
Picture

THE END

And that's it - pretty simple if you know the basics. I hope this can save you some time coding.
0 Comments

WARRANTLY

5/6/2013

0 Comments

 
Picture
Yes it's true - I founded a startup! This is the reason why I neglected writing a blog for last couple of months. So, in the future, I'll write mainly on startup topics. For months now I tried to think of a good idea for sturtup. After couple of very bad ideas and couple of less bad ideas but not good enough, I finally got the right one. During the last couple of months this idea evolved into well structured product. There are 5 guys in the team, we are almost at the end of building our MVP and we are already in the talk with few companies that are interested in using this software. In the next couple of lines I'll describe what we are building.

Warrant.ly is a system that allows retailers to issue online warranties to customers instead of paper ones. In this way, all problems that may occur with the purchased device within the warranty period can be easily solved through the website. The customer will report the problem to the retailer and they can arrange the repair easily through the website as well. The customer will also be able to check its status. What is more important to the customers, they will be able to keep their warranties in this system even though they were issued the old-fashioned way – in a paper form. The customer just needs to enter basic information about the device and to take a picture of the warranty.
Picture
This is just a basic description, retailers will get much more possibilities in this software so they can really improve their business. They can create and offer extended warranty plans to their customers and also send some offers about specific devices to targeted users.

We already presented our startup to some investors. We attended mini Seedcamp event in Belgrade in April and we got very good feedback although we didn't manage to get into Seedcamp program. Also, some other startup incubators in the region contacted us about possibilities of joining them. We'll see what's the best option for us at the moment.

That's it for now, come back soon on this site to find more news about this startup and startups in general. And of course, if you are a retailer and you are interested about possibilities our software offers, please contact me. I guarantee that your business can only improve and progress by using Warrantly.
0 Comments

SPRING 3 + HIBERNATE 4 + MYSQL + MAVEN + TOMCAT

27/12/2012

10 Comments

 
I've started several times by now to work on the Spring project from scratch, where I had to combine several different tools so that I can begin to program something concrete. That procedure eats time, and every time I forget something how I done it previously. Since I started writing this blog, it would be probably smart to write down the whole procedure if I forget anything next time, and perhaps also help someone to start a project and not spend hours banging their heads on how to combine a couple of tools in one whole project.

Prerequisite

This won't be literally step-by-step tutorial, I expect that everybody can download the latest versions of these tools that I will use. You will need Eclipse, Maven, Tomcat, MySql and you should download and install the latest versions. You don't need to download Spring and Hibernate since we will tell Maven to download it for us (we will configure XML file). And finally you should download Twitter Bootstrap because I will use it for front-end part in our JSP. If you haven't heard for this tool, it is basically a set of CSS and JavaScript files developed by Twitter so programmers can easily and fast create some fancy pages and features on these pages. You will also need jQuery because Twitter Bootstrap uses it.

Eclipse + Maven + project structure

Let's roll! When you open Eclipse you should create Maven project, BUT I suggest that you create simple Java project. After that you should convert it into Maven project. I like to do this way because when you create maven project the wizard will ask you to enter many confusing things about the project, and you could be puzzled with it if you didn't work with Maven before. When you create Java project, you only need to enter project name, the wizard for converting this project to Maven will do the rest. For this converting you should select your project and under configure submenu you should find 'Convert to Maven project'. Now you have your Maven project. Next thing you should do is to set your project structure, that is to create all the folders in the proper places of your project that you will be needed to launch the site in the browser. I suggest that you first delete the source folder 'src' and create your own source folders: 'src/main/java', 'src/main/webapp' and 'src/main/resources'. After that you should create the other folders (css, img, js) under 'src/main/webapp', you can see the structure on next picture:
Picture
In this step you should also create landing-page.jsp and that will be the first page that is displayed in the browser when you start your project. For now, you can insert in this file any text you want, you just want to test if that text is displayed in the browser when you start your project. Later we will modify this file.

The next thing you need to add here is three files: applicationContext.xml, spring-servlet.xml and web.xml. Now, you should edit these files if you want to run the project. I am not going to post the code that you need to add in these files, but you can download my project from: https://github.com/nikolatodorovic/spring_hibernate_mysql_maven_tomcat and you can see the content of these files. There are plenty of explanations about these files on the Internet and it would be probably good to read them.

The last thing, but maybe the most important is to configure pom.xml file. It is the main file for Maven and it contains information about the project and configuration details that Maven uses to build the project. In this file, you are telling Maven to use Spring and other tools. Therefore you don't need to download anything about Spring or Hibernate, only you need to do is to configure this file and Maven will do it for you. Again, I won't post code here, you should download it and copy/past from my project. Every other explanation about this you can find across the Internet.

Maven build + Tomcat

So, we now want to start this project and we need Tomcat for that. But first we need to build it. You can easily do this by using Maven commands. I recommend that you create run configuration with defined goals and after that you can build your project within Eclipse, you don't need to use command line. When you create new run configuration you should select your project (base directory) and enter 'clean install war:inplace' in goals field. That command will create WAR file from your files.

Now we have WAR file and we need to start Tomcat instance so that we can deploy this WAR file to that instance. You can copy and past this WAR file in the folder: 'tomcat_home\webapps' but don't do that. Every time you make some change on any file inside your project, you need to stop Tomcat instance, do another Maven build, copy/past new WAR file in this location and start Tomcat instance again. This is really pain in the ass... Instead of that, you should configure your Tomcat so it can read your files from your workspace. And if you do that, when you modify something in your JSP while your Tomcat instance is running you even don't need to stop that instance, do another Maven build and start Tomcat again. You just need to refresh your browser to see those changes. This procedure saves time incredibly! And it is very easy to accomplish this, you need to create one XML file with the name of your project, put it in: 'tomcat_home\conf\Catalina\localhost' and insert this code in the file:

<Context docBase="D:\Workspace\Eclipse\MyFramework\src\main\webapp"></Context>

Of course, you need to set your own path. By doing this, you are telling Tomcat where is located your source folder with JSP files, CSS files, JS files... When you do that you only need to restart Tomcat if you make some changes on the back-end, not on the front-end.

Now this is the time to test if this is working. If you did everything correct, when you enter your project name in the browser, your login page should be displayed. You can change some text in that file so you can test if refreshing of the browser displays changes on that page.

Spring

Next thing we'll do is to create a few basic pages, create layout for our project and use a little of Twitter Bootstrap for front-end. You should have a project structure as it is shown on the next picture:
Picture
From this picture and downloaded files, you can see what you should do with Twitter Bootstrap's files. You should also create controller files where is all the logic located. These are very simple files so I don't need to explain how it works, I hope you can manage it yourself. Be sure to set up your pom.xml file correctly to use Spring.

Hibernate + mySql

Now let's go to another step - adding some database in the project. If you downloaded this project from gitHub you can find a file in it called database.sql. You should run that file on your own database so you can configure this project correctly. When you install mySql, you should choose what client you will use for managing you databases. I am using Heidi (www.heidisql.com), but you can use whatever you want... After creating this database, you should open file jdbc.properties located in WEB-INF folder and edit it according to your database connection parameters.

After you created database, you need to configure pom.xml file so you can use Hibernate in your project. If you copied my pom file, you should be fine. At the end you have to create hibernate.cfg.xml file under 'src/main/resources' and copy/past content from my project. Now it is all set up for using Hibernate and you can create model classes, DAO classes and service classes. This is a very good procedure how you can organize your code, but you can organize it anyway you like.

The End

And that's basically it. I won't go into details on how to use Spring, Hibernate, you can find all the necessary infos on the Web. Also, study my project and you can learn how to set up your configuration files, how to add pages, entity classes and so on... Since you read this this far, I hope it was useful :) Please leave a comment if you have any suggestion.
10 Comments

My First Blog Post

2/11/2012

4 Comments

 
Picture
Hi everyone! This is my first blog post ever. After several years having very ugly looking personal website, I decided it's time to make some radical changes and to launch a completely new presentation. So, few days ago I started looking for a easy-to-use tool that I can use to build some nice looking but simple website. And I came across Weebly. It turned out that this is really cool online tool with which you can create website within a few hours! Another great thing about Weebly is that you get free web hosting on their server when you create a site. Only you need to do is to create some good content, choose a theme and it is ready to go.

The next thing that you should consider is to choose your web address. Weebly lets you use address in a form "yourAddress.weebly.com". If you don't like it and you want to have some cool address, you can always register some domain. I finally decided to register www.nikolatodorovic.com because I don't want some wacko use that cool name for website instead of me... You have plenty of sites where you can register your domain, maybe the best known is goDaddy, but I decided to register it on nameCheap.com. It cost around $10/year and domain name was available to use after only few minutes. Some domestic sites for registration say that you need to wait for 24/48 h which is really stupid... Another cool thing about this nameCheap site is that when you spend some amount of money on their site (maybe about 50$) you can use 'coupon code' which allows you to have a discount when you purchase some service. So, with that coupon you can buy a domain name for about $4/year.

The last thing before publishing a site is to connect your domain to website created with Weebly. That procedure requires only few minutes since you have to enter IP addresses which Weebly provides to you to specific fields on your domain registrar's control panel. All the instructions you need is on Weebly's website so if you ever wanted to create your own personal website, this is your chance. 


4 Comments

    Nikola Todorovic

    Software developer from Belgrade, founder of Warrantly.

    Archives

    December 2015
    August 2015
    March 2015
    January 2015
    December 2014
    October 2014
    September 2014
    August 2014
    June 2013
    December 2012
    November 2012

    Categories

    All
    Ajax
    Angular
    API
    DataTables
    Hibernate
    Holiday
    Maven
    Metaprogramming
    Mysql
    Oracle
    Postgres
    Rails
    Ruby
    Sea
    Software
    Spring
    Startup
    Tomcat
    Turkey
    Website

    RSS Feed

Powered by Create your own unique website with customizable templates.